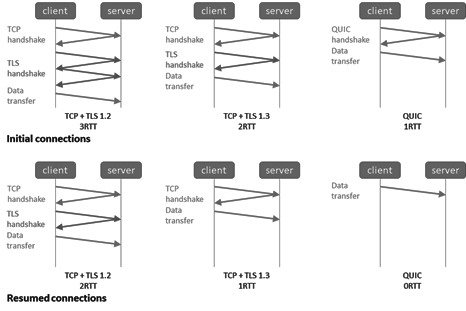
QUIC assures to mitigate some of the disadvantages of TCP and HTTP2 when building cloud-scale web apps and services.
- QUIC decreases connection times over TLS• TLS 1.3 replaces the lengthy TCP TLS handshake and encryption key exchange with a single handshake.
- QUIC with UDP prevents the data transfer overhead of TCP.
- QUIC offers parallel streams of reliable and unreliable application data.
- QUIC offers better performance in case of data packet loss.
- When data packets are lost, HTTP/2 over TCP suffers from head-of-line blocking. If one data packet is lost, the receiving end waits to retrieve it. HOL blocking impacts the connection performance negatively as other streams are blocked while waiting for this.
- The QUIC protocol allows streams of data packets to reach their destination independently. As such, performance is a lot less impacted by data packet loss.
- An unreliable datagram extension to the QUIC protocol is in draft.
- Connection reuse: server to client session ticket in TLS 1.3.
- Easy connection migration (network changes) leads to more stable connections.
- When your network changes (IP address, port), your connection times out and needs to be reestablished with TCP.
- QUIC uses “unique identifiers” to make connection migration smoother. Reestablishing these is done by sending a packet instead of establishing a new connection, even when your IP address changes.
- Easy development encourages faster adoption
- QUIC can be implemented on the application level, making it easier and more flexible.
- TCP is part of the operating system kernel. Therefore, you are dependent on that implementation.
QUIC Adoption Challenges
Let’s briefly overview some critiques and challenges QUIC faces during adoption. First, people are not always aware of the benefits or are happy with how things are because they are less impacted by the drawbacks of TCP.
Performance concerns:
- QUIC doesn’t do 25Gbps yet today. But does it have to do so for current use cases? Of course, what is not possible today will be in the future. Take a look at Making MsQuic Blazing Fast – Microsoft Tech Community and see the work done on performance and offloads ( improvements in W2K22 like UDP Segmentation Offload (USO), UDP Receive Side Scaling, and improved UDP data paths.
- Inertia and FUD. A lot of old-school security appliances still cannot handle QUIC. The industry should address the challenges for QUIC with NAT/ECMP (4 Tuple vs. Connection ID)
- Security concerns of the TLS inspection need, app visibility & control.
- The risk of breaking DDOS detection and prevention (UDP); challenges to logging and reporting on search terms and viewing lists. Any open port in a firewall carries risk.
- QUIC has its own benefits due to TLS 1.3/HTTPS. Such features lead to specific architectural choices (connection resumption, 0-RTT).
- Most of these considerations are related to TLS 1.3 and the mandatory use of Perfect Forward Secrecy.
Despite all the above, the world is moving from pilot to production use of SMB over QUIC.
What Is SMB over QUIC?
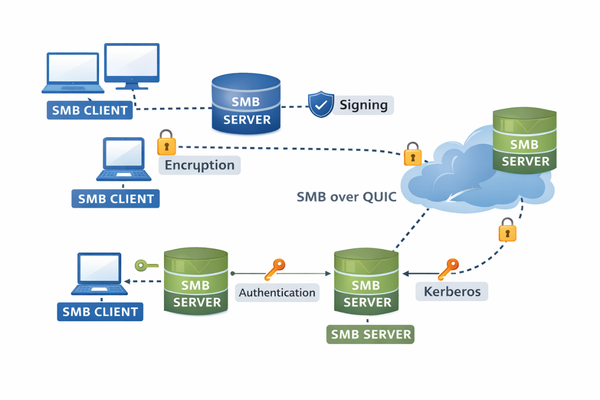
SMB over QUIC is an alternative to TCP-based SMB, designed for secure file sharing over untrusted networks like the Internet. It replaces TCP/445 with UDP/443 and uses TLS 1.3 certificates for encryption and authentication, eliminating the need for passwords. This ensures that all SMB traffic – including authentication, multichannel, and compression – remains encrypted while seamlessly passing through edge firewalls. The user experience remains unchanged.
Without TCP/445 allowed on the firewall for internet traffic, a VPN connection is the only alternative to accessing SMB file shares on-premises or Azure. SMB over QUIC eliminates the need for a VPN in this scenario. On top of that, the experience for accessing file shares remains the same inside or outside your corporate network. Because of this, Microsoft likes to call SMB over QUIC “SMB with an automatic TLS 1.3 built-in VPN.”
Microsoft loves QUIC for SMB as the protocol concentrates on the user’s needs. The protocol is secure and allows for easy network changes and more stable connections, which is important from an engineering perspective while building cloud-capable and scalable services. SMB over QUIC provides a transparent user experience no matter where the user works (no VPN required).
YNQ
YNQ is Visuality Systems’ embedded SMB brand name. This library allows SMB Server and SMB Client connectivity developed for non-Windows embedded systems for interoperability with Windows-based machines. Both the YNQ client and the server will have SMB over QUIC support available. Now “embedded systems” are something you should interpret liberally. It also supports Apple iOS for its iPad tablets and iPhone smartphones. So this library allows developing client applications with SMB over QUIC that run on iOS. It also provides a system driver for non-Windows operating systems.
YNQ is designed with the flexibility to integrate into virtually any environment, be it an operating system, a CPU, or a compiler. YNQ enables file sharing among multiple embedded devices, browse each other’s SMB shared folders remotely and read, write, edit, copy, delete and update each other’s files. These operations do not require transferring the entire file to/from the device’s local disk or memory, which is highly efficient.
jNQ
Several systems running in my lab do not support SMB over QUIC natively. For example, even the most recent versions of operating systems like Windows Server 2022 and 2019, Windows 10, and Ubuntu 20.04 and 21.04 have no SMB over QUIC support. Yet, thanks to an application that Visuality Systems has built for demo purposes, I can access Windows file shares on Windows Server Datacenter Azure Edition via SMB over QUIC from those client systems. The demo application leverages its jNQ Java SMB Client library. You can use this library with all major Java implementations, such as Oracle’s Java, OpenJDK, and IBM’s Java). In addition, jNQ provides SMB file and data sharing client functionality to any Java application (Java 1.8 or higher).
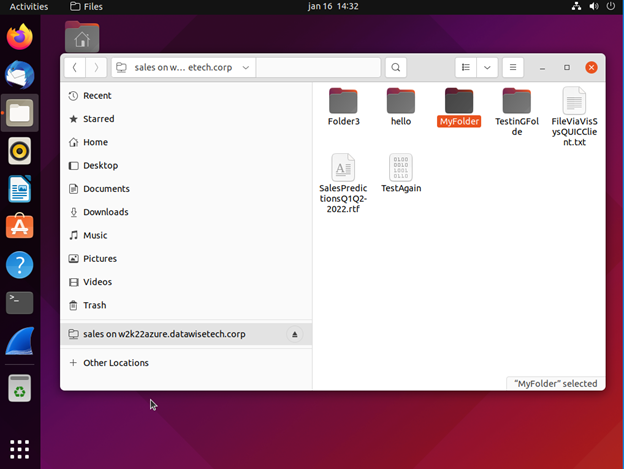
In the screenshots below you can see me using file shares on a Windows Server 2022 Datacenter Azure edition via SMB over QUIC from any Linux and Windows operating systems that do not have native support for SMB over QUIC.
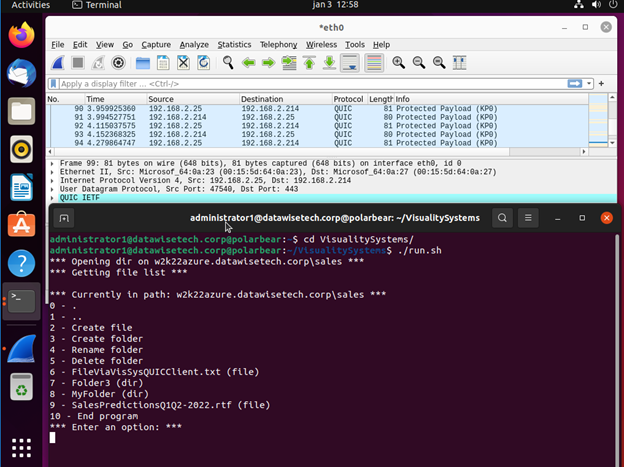
The screenshot below shows a running test app built with the jNQ SMB client library on Ubuntu ANY LINUX OS. 21.04 Desktop edition. I can create files and folders, read and write files and navigate to folders. I used Ubuntu in the lab, but it works with any Linux distro.
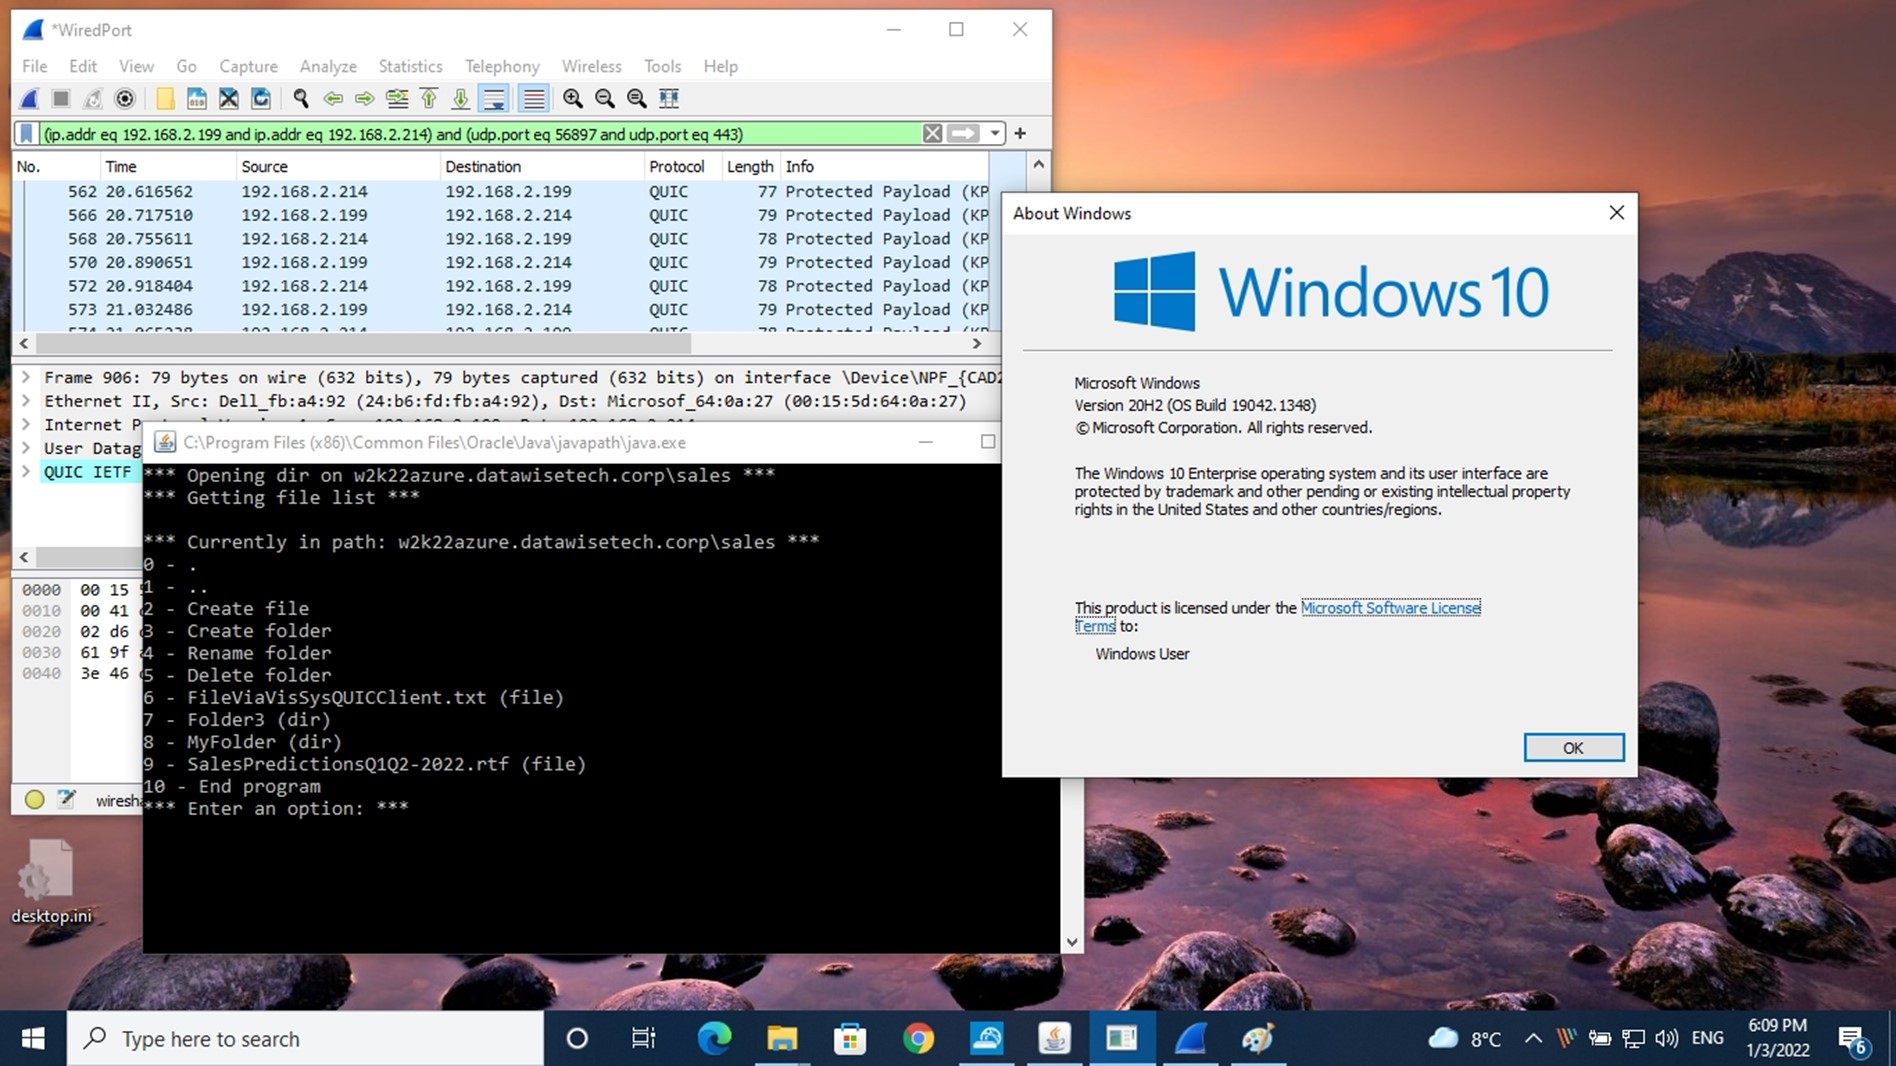
We have the same application running on Windows 10, allowing us to access the file share over SMB over QUIC. It would run on Windows 8 or Windows 7 and Windows 11, for that matter. The application uses the Visuality Systems library and is not dependent on the capabilities of the SMB client in the operating system.
Applications that leverage the SMB libraries from Visuality Systems open up many more operating systems and platforms to the benefits of secure file share access over the internet via SMB over QUIC. As a final example, let’s look at Android. Below you see a screenshot from Visuality Systems’ QUIC File Manager.
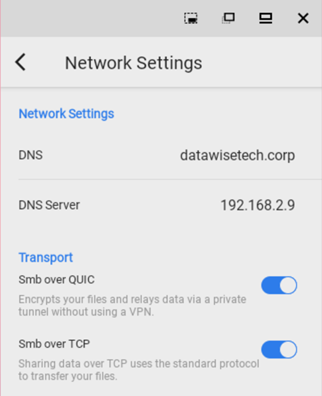
It works with both TCP and QUIC. That’s right; we have SMB over QUIC from Android phones or tablets. You can either use the system’s DNS or specify custom DNS settings.
Linux system driver
What if you could get an SMB client as a system driver? One that you can install on any Linux system, for example. What if that driver supports SMB over QUIC? Well, that would mean you could install it on a Linux host and access a file share via SMB over QUIC straight from your Ubuntu Nautilus file manager. Guess what? Visuality Systems offers SMB over QUIC support for their driver. Imagine the possibilities!
Authentication
NTLMv2 and Kerberos
Visuality Systems’ libraries support both NTLMv2 and Kerberos. In an Active Directory environment, like on a corporate network, when a domain controller is reachable, Kerberos is available, so that’s what the client uses to authenticate to the file server when accessing the file share. That is the preferred and safest way. When a domain controller and Kerberos are not available, NTLMv2 will be tried and used when possible (if not blocked or disabled).
For example, when a client on the internet has no line of sight to a domain controller, it leverages NTLMv2. That entire process is secured and encrypted inside the QUIC TLS 1.3 AES-128/256 encrypted tunnel. So it is safe from harvesting.
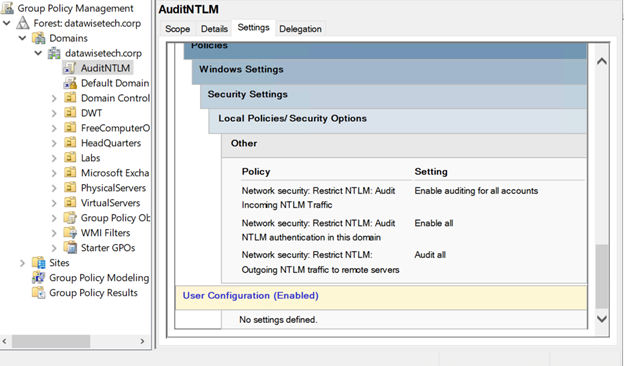
Tip: An easy way to see where and when NTLM comes into play is to audit it via a group policy. It allows you to see when NTLM authentication occurs from what client in the Microsoft-Windows-NTLM / Operational event log on your domain controllers.
Kerberos Support & KDC Proxy Server Support
If you want to complicate a security discussion in a meeting with a Chief Information Security Officer, you should mention that your solution requires NTLMv2. I’m sure many organizations still have it enabled in their IT environment, without needing it. The sky won’t fall on your head when you set it up correctly. But from a technology debt perspective and in organizations that continuously raise the security bar, it is not something that will make a CISO happy. As a result, many are working on reducing or, when possible, removing NTLMv2 in their environments. For SMB over QUIC to succeed in these environments, it needs to address this. Hence SMB over QUIC can leverage Kerberos not just on the corporate network when it has a line of sight to a domain controller. In fact, it can use Kerberos even over the internet when you leverage a KDC proxy and access it over HTTPS/443.
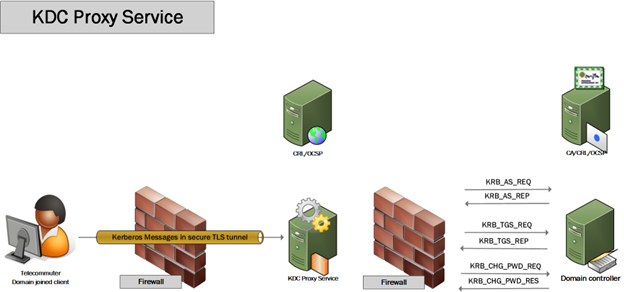
In Windows, you can configure a client to try and use a KDC proxy when it cannot find a domain controller. Additionally, custom-written applications leveraging a library from Visuality Systems can leverage a KDC proxy. Awesome right? Secure SMB file share access over the internet thanks to QUIC, and you get to leverage Kerberos as well.
The Future Looks Bright
Azure Files supports Kerberos authentication, including over the internet using a KDC proxy, either on-premises or hosted in Azure. File shares can be exposed via SMB over QUIC to any compatible SMB client. Devices must be domain-joined, which is also possible with Linux, or have a line of sight to a domain controller or KDC proxy, with client support for Kerberos.
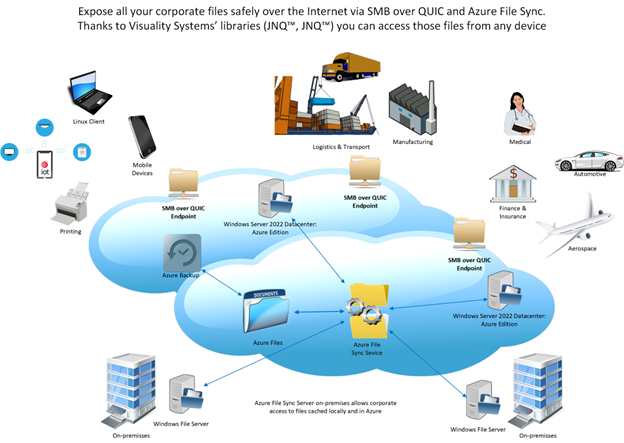
SMB over QUIC in Windows Server 2022 Datacenter: Azure Edition enables secure internet access to Azure Files and Azure File Sync data, eliminating the need for a VPN. This setup works in Azure or on-premises via Azure Stack HCI. Azure File Sync allows you to centralize and protect on-premises file data in Azure Files, and expose it securely via SMB over QUIC from Windows Server in Azure IaaS.
In such hybrid architectures, file shares previously restricted to internal access become securely available from almost any location. Solutions built with Visuality Systems’ jNQ and YNQ libraries can seamlessly access file data via SMB over QUIC across platforms and environments.
Whether deployed on-premises, in hybrid setups, or in the public cloud, Visuality Systems supports secure, modern access to file data using SMB over QUIC.
SMB over QUIC Potential
There is a vast market and much potential for SMB over QUIC. However, developing and growing that market would be easier and faster if more SMB over QUIC clients were available. We need more clients within the Windows OS world and other platforms, especially mobile ones. That is precisely what Visuality Systems is offering. By doing so, they enable anyone to leverage SMB over QUIC in their applications and help grow that market. The only limit here is your imagination.
Just think about the possibilities for users and applications to access Azure file shares or file shares on Windows Server 2022 Datacenter Azure Edition securely over the internet using SMB over QUIC. As we stated before, file shares are not dead. On the contrary, they are essential to many existing and new applications and solutions. For example, even containers, the development world’s current favorite poster child, leverages SMB file shares for access to storage needed to persist data. Opening up that data via SMB over QUIC, securely but more conveniently, is precisely the aim and purpose of Visuality Systems’ products. In that sense, this is totally in line with Microsoft’s vision for SMB over QUIC. But even better, they are opening up SMB over QUIC outside of the limited number of supported Microsoft clients. They are the pioneers, blazing a path for others to use and create applications.
With Windows Server 2025, SMB over QUIC is no longer limited to Azure Edition, enabling broader adoption of secure, VPN-less SMB access. Organizations should configure TLS 1.3 certificates properly and follow best practices to maximize security.
Learn more: Visuality Systems’ QUIC Add-on – Enabling SMB over QUIC for YNQ and jNQ.
For any SMB-related needs, contact Visuality Systems – The SMB Protocol Experts.